
What are forms good for?
Forms are useful for encouraging the learner to think about the subject at hand and record their responses. This helps to keep the learner engaged and to embed learning.
Unlike quizzes, which you will typically use to check a person's grasp of the knowledge and/or skills you're trying to impart in your program, forms are typically more open-ended, usually don't have right or wrong answers and can be used for many different purposes. Think about how you might use forms to:
- encourage self-reflection
- get your participants to dig a little deeper
- problem solve
- collaborate within the learning circle
- generate new ideas
- evaluate strengths and weaknesses
- brainstorm opportunities
- identify gaps in a solution
- diagnose what could be better about a particular product or service
These are just a few ideas. Really, you are only limited by your imagination!
How forms appear in the front-end
When a form activity is opened, it first lands on the overview screen (as is the same for all activity types). On this screen is the synopsis, of which the purpose is to give the learner an overview of the activity and what is required to complete it. In the case of a form activity, it could explain to the learner the purpose of the form they're about to complete and what's expected of them.
Beneath the synopsis there is the 'Start activity' button to open the form.
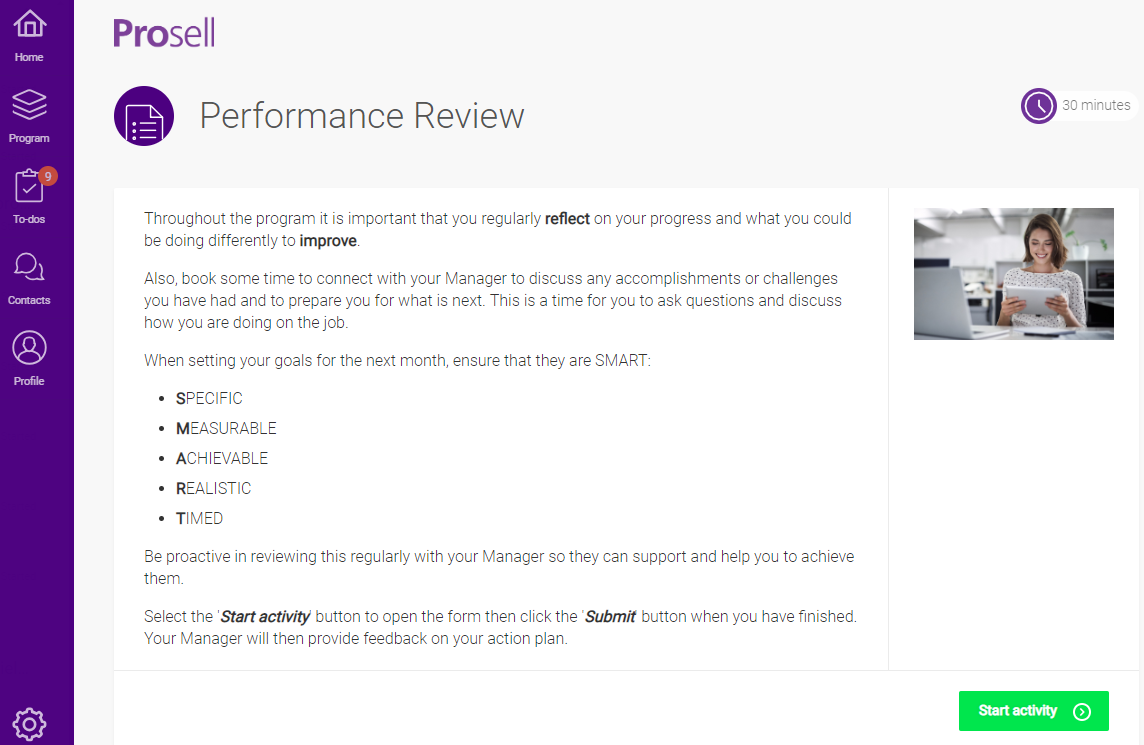
Within the form itself, the learner will need to enter their responses in the available fields and press 'Submit' when finished.
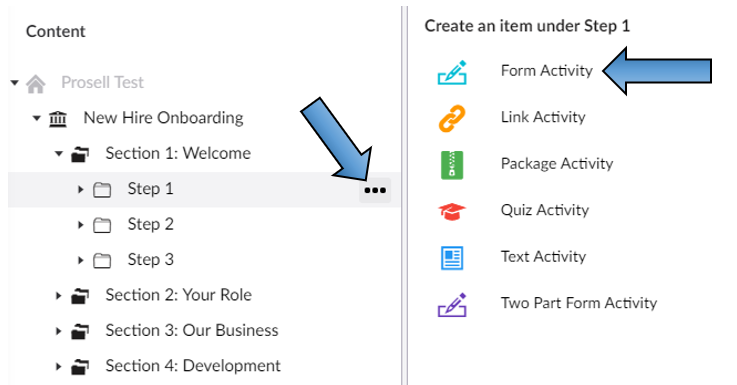
Creating a form
Create an activity within a step and select 'Form' when you are presented with the list of types to choose from.
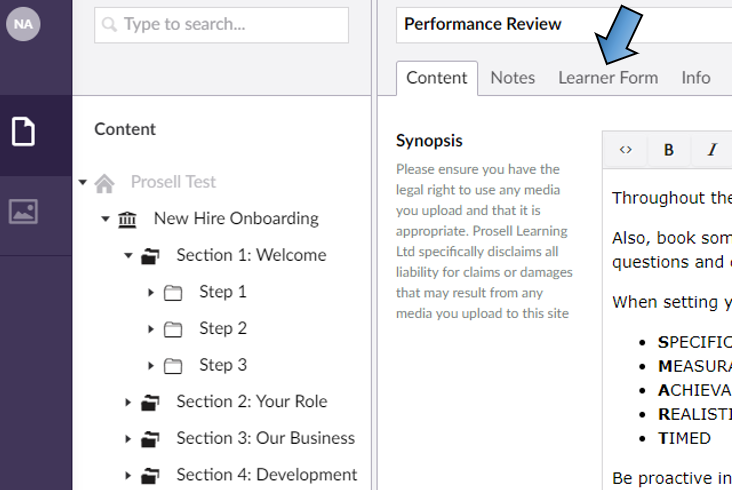
Within the 'Content' tab for the new activity, you will find the common fields that all activity types share (e.g. synopsis, thumbnail and icon). However, there will be a 'Learner Form' tab that is only included in this type.
To save a form activity, it must have a name and at least one form field. This is to ensure that administrators do not forget to add form questions, which would result in learners having an empty activity. If you try to save the activity without having done this, you will see a validation error message.
To add fields to your form, select the 'Learner Form' tab along the top of the activity.
The 'Learner form title' field is optional - the text that's entered here will appear at the top of the learner form, but the activity name will always appear above this so it's not imperative to add this additional title.
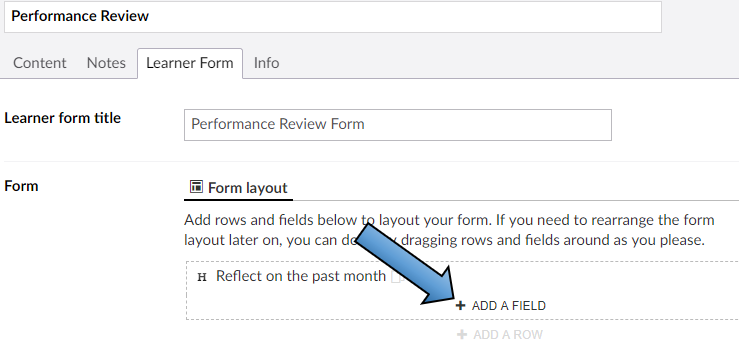
To begin adding questions to your form, you will first need to add a row, which appears beneath the 'Form layout' label.
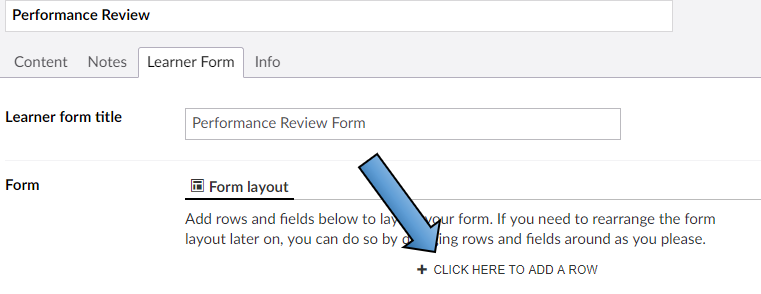
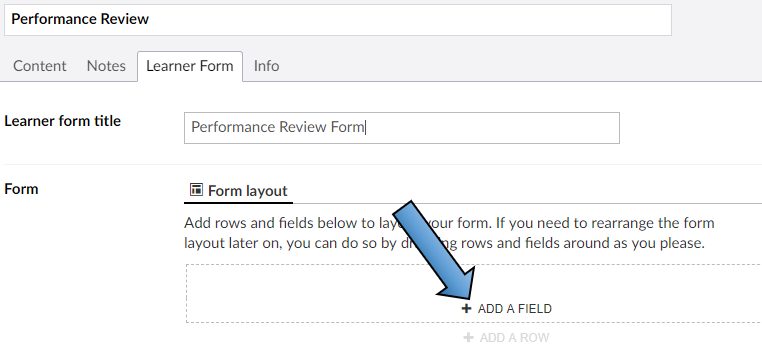
You will then have the option to 'Add a field'.
A list of field types will appear for you to select from. If you plan on having more than one group of questions in your form, then we recommend inserting a 'Heading' to separate the groups and label what they are.
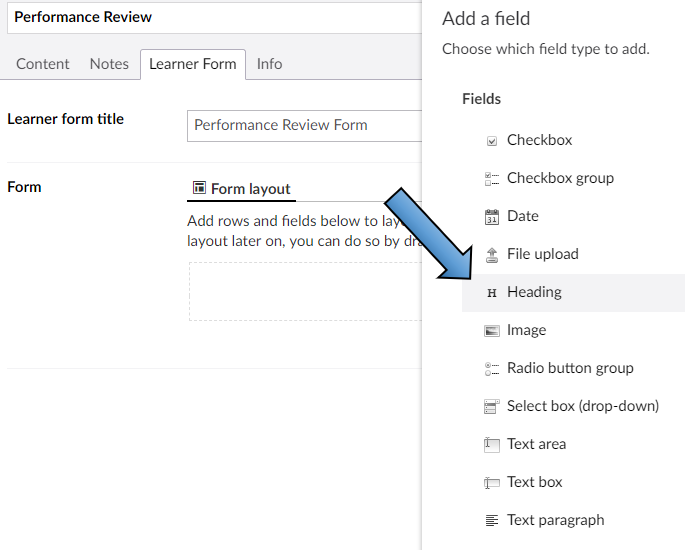
For field types that are simply to display content in the form and do not require learner input (Heading, Text paragraph and Image), there is only one box to fill out, which is the text to be displayed.
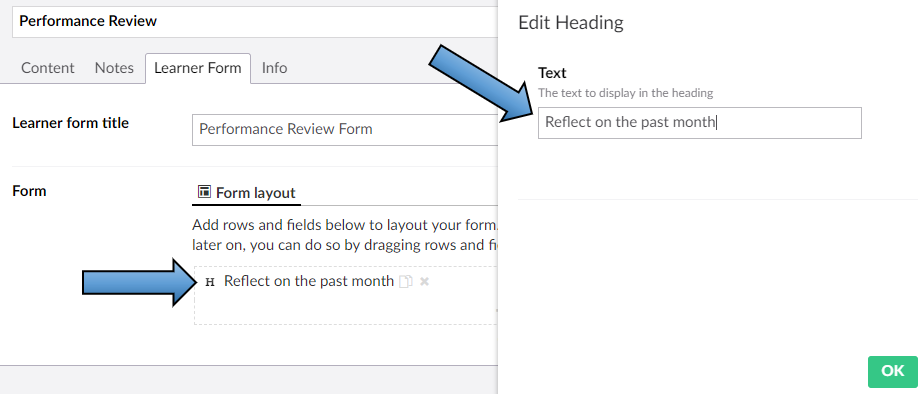
You will then see the field you just created within the form layout page.
To add another field, repeat the process of clicking 'Add a field' just beneath the fields already created.
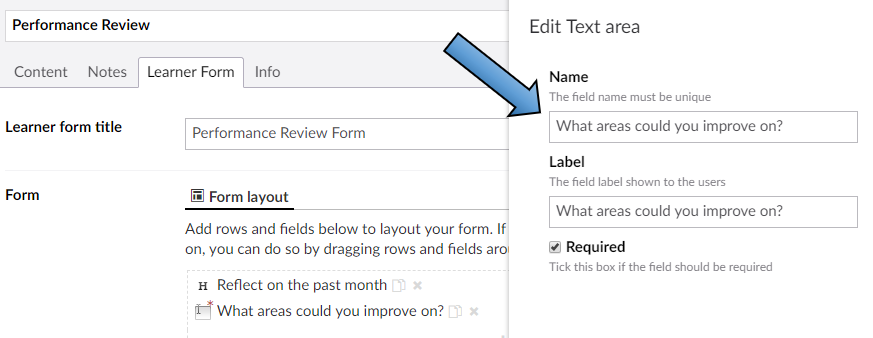
This time we will select a different field type - Text area. All field types that require learner input (which are all except those mentioned above - Heading, Text paragraph and Image), will require a 'Name' and a 'Label'. The Name is what is displayed in the admin view (area below the form layout label), and the Label is what's displayed to users in the front-end who are completing/viewing the form.
It would usually be the case that both the Name and Label fields would have the same text - meaning you can copy and paste from one into the other (shortcut: type question in name field, press Ctrl+A to highlight all, followed by Ctrl+C to copy selection, then press the 'Tab' key to move into the Label field, and Ctrl+V to paste).
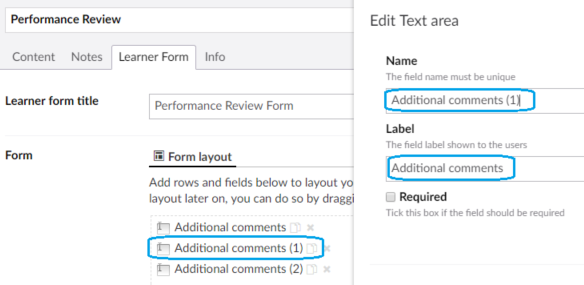
Please note that the Name field must be unique, which means that you cannot have two fields in the same form activity with the same name. They can have the same label (what's displayed to users in the front-end) but not the same name (what's displayed to admins in the back-end).
So, if you need multiple fields in the same form with the same label, e.g. "Additional comments", then these same words can be typed into the Label field but for the name field they should be differentiated. In the example below, numbers have been used.
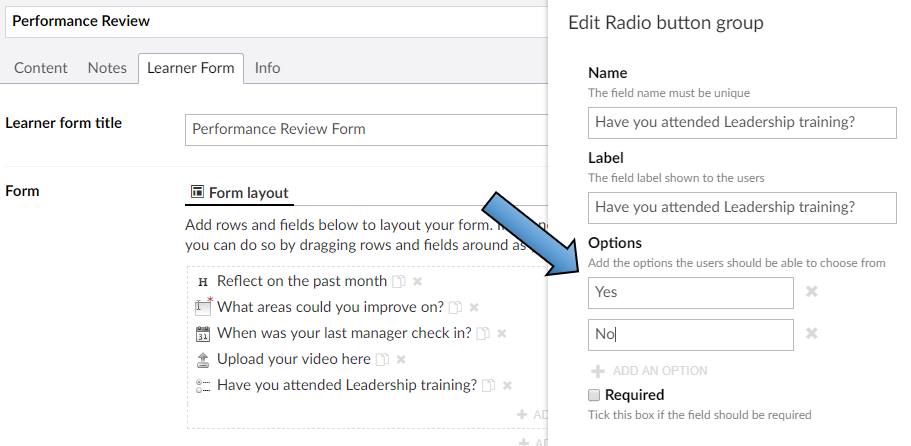
The field types Checkbox group, Radio button group and Select-box (drop-down) all have another section for 'Options'. In the example below, this is a radio button field where learners will be able to select just one of the available options, whereas for checkbox group they can select multiple options, making them more suited for checklists.
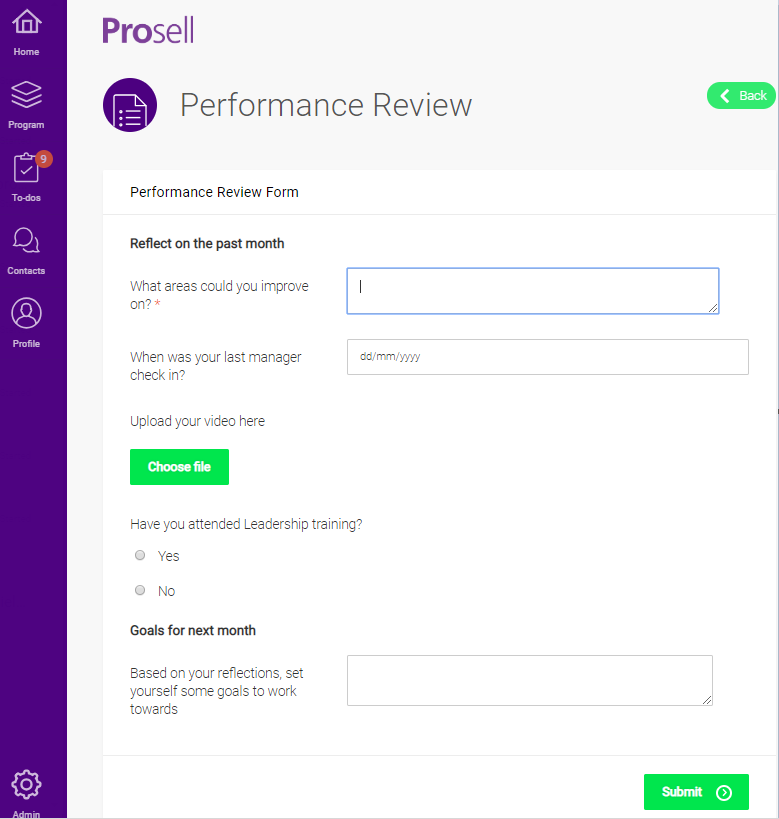
There is a 'Required' checkbox for each form field, which can be ticked if the field must be completed to submit the form. This ensures that no questions are left blank, which may or may not be desired depending on the type of form it is. There might be some questions in a form that are required and some that are not. For example, in an evaluation form you might make all quantitative items mandatory and then an 'Any further comments?' text box at the end optional as it should only be used if it applies to them. Mandatory fields are indicated by a small red asterisks beside the field (see field 'What areas could you improve on?' in the screenshot below).

The screenshot above is the view of the form as it appears in the content builder. Scroll up to the top of this article to see how it appears from a user perspective.
Copying and deleting form fields
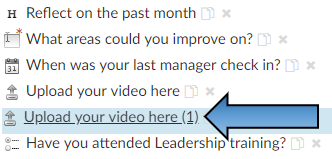
To copy an existing form field, click the small icon to the right (two overlapping sheets of paper).

The new copy will be created with a number beside its name, because of the matter mentioned earlier in this article about the field names having to be unique (their 'labels' remain the same, however). You can select the item to edit it or click and drag to re-position.
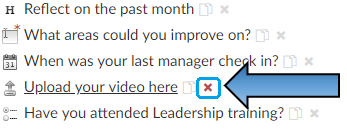
A form field can be deleted by clicking on the small cross to the right of the copy icon.
Form field types
When adding fields to your form, you will be presented with the following list:
Checkbox: can be used to present a statement to the user for them to tick (or leave unticked) depending on whether they comply or not.
Multiple choice: allows you to add multiple checkboxes to your form, where the learner can select one or more of the options.
Date: allows you to add a date picker to your form. This useful calendar feature makes selecting dates easy for the user.
File upload: allows the learner to upload a file to the form. Just some of the file types that are supported are image, video, Word, PowerPoint, Excel and PDF.
Heading: field type is used to label a group of form fields and separate them from other groups. For example, within a Personal Development Plan you might have a section on reflecting on the previous week and then another section for setting goals for the week ahead. In this situation you would use headings to distinguish between the two.
Image: field type is used to display an image within the form, along with a caption. There will be no input required from the front-end user, however you could insert an image followed by a text area field asking the user a question related to the image.
Radio button group: present a list of options to the user, where they will be required to select only one of them. This field type can be used to create a survey with Likert scales.
Select box (drop-down): similar to the above, in that the user is required to select from one of the options listed. This is just an alternative way of displaying the options.
Text box: used to elicit short answers from the user as they are provided with a small box area to type in.
Text area: used to elicit long and detailed answers from the user as they are provided with a large box area to type in.
Text paragraph: used to display text to the user within the form. This could be some additional information for the user, advising them on what to focus on or how much detail should be included.
Comments
0 comments
Please sign in to leave a comment.